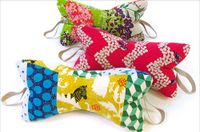
A neck pillow is a simple yet effective accessory that can provide comfort during long flights, car rides, or simply while reading or watching TV. Here's a step-by-step guide to making your own neck pillow.
Materials
- 1/4 yard of quilting cotton (or a fat quarter): This is the main fabric that will make up the pillowcase.
- 1/4 yard of anti-pill fleece: This material will be placed inside the pillowcase to reduce pillowing.
- 1/8 yard of fusible interfacing: This is used to add stability to the pillowcase and help it maintain its shape.
- Thread: Select a matching thread in a color that complement's your fabric choices.
- Stuffing: Polyester stuffing is recommended for its durability and water-resistant nature.
- Snap fastener: For attaching the strap to the carry-on luggage.
Step-by-Step Guide
1. Prepare the Patterns
Print out the neck pillow pattern and cut it out. You will need two pattern pieces, one for the front and one for the back.
2. Cut the Fabric
Fold the fabric in half and place the pattern on the fold. Pin the pattern in place and cut out two identical pieces of fabric following the pattern's instructions. You should have two pieces of fabric, one for the front and one for the back.
3. Prepare the Straps
Cut two 2-1/2 x 4-3/4-inch pieces of quilting cotton. press the interfacing onto the back of one piece of cotton and fold the other cotton piece in half lengthwise. Sew both pieces along one long edge and one end, leaving a 1/4-inch gap at the corner for turning.
4. Assemble the Pillow
Pin the two strap pieces to the outer curve of one pillow piece. Sew the two pillow pieces together with right sides facing. Starting on theinner curve of the pillow, sew around the shapes, backstitching at the beginning and end. Use a 1/4-inch seam allowance.
5. Stuff the Pillow
Turn the pillow right side out and fill it with the stuffing until it is firm but not too hard.
6. Sew the Opening Closed
Use a ladder stitch to hand-sew the opening closed. Take small stitches on one side, then cross over to the opposite side, and continue in this manner until the entire opening is closed.
7. Attach the Strap
Install a snap fastener to the end of one strap piece following the manufacturer's instructions. If desired, you can also sew hook and loop tape instead of a snap fastener.
##That's it—your neck pillow is complete and ready to enjoy on your next adventure. Whether you're traveling or just relaxing at home, a neck pillow is a thoughtful and practical item to have.
Variation: Make It a Travel Pillow with Straps
For an extra touch of functionality, you can modify the neck pillow pattern by adding straps that attach to your carry-on luggage. This is a great gift idea for travelers and can make the颈 pillow more secure during transport.
Advanced Techniques
If you're feeling adventurous, try adding decorative stitches or embroidery to the pillowcase for a unique and personal touch. This can also be a fun way to practice your sewing skills.
FAQs
Q: Can I use different types of stuffing?
A: Sure, you can use a variety of stuffing options depending on your preference. Common options include polyester, shredded memory foam, microbeads, and feathers.
Q: Can I machine wash my neck pillow?
A:大部分枕头的填充物都可以机洗,但建议先将填充物取出,然后按照枕头的洗涤标签进行操作。一些填充物可能对热敏感,因此在处理前最好先咨询制造商。
Q: How can I make the pillowcase more stable?
A: To make your pillowcase more stable, you can add a layer of plastic batting or an alternative stabilizer between the lining and the exterior fabric.
##With these instructions, you'll have a professional-quality neck pillow in no time. Whether you're traveling or just looking to relax, a neck pillow is a great tool to have on hand.
Resources
For more detailed guidance on various sewing projects, including patterns and tutorials, be sure to check out the resources listed below.
Related Projects
- Sew a Mini Neck Pillow for Traveling
- How to Make a Neck Pillow
- 30-Minute Therapeutic Neck Pillows – Sew4Home
- DIY Travel Pillow {Neck Pillow} – Free Pattern | TREASURIE
- DIY Travel Pillow with Free Travel Pillow Pattern
- DIY Travel Pillow – Supplies|Video
Sewing Basics
- Sewing Machine and Standard Presser Foot
- Fabric and Other Supplies
- Sewing Machine and Standard Presser Foot (multiple quantities)
- ⅔ Yard of ¾" to 1" Ribbon or Tape per Pillow
- ONE Medium Bag of Premium Polyester Fiber Fill
- All-purpose Thread to Match Fabric
- See-Through Ruler
- Fabric Pen or Pencil
- Iron and Ironing Board
- Scissors or Rotary Cutter and Mat
- Seam/Groove Gauge
- Seam Ripper
- Straight Pins
- Hand Sewing Needle
Helpful Tips
- Before starting: Read the entire tutorial to ensure you understand the process.
- During assembly: Use a sewing machine or a针线来缝合,根据需要调整缝纫速度。
- Troubleshooting: If mistakes are made, try to remain calm and follow the instructions to fix them.
- Final Touches: Once the project is complete, let it rest for a few hours to allow the glue to dry completely.
Acknowledgements
Thanks to everyone who supported me during the development of this website and especially those who contributed their time and expertise to create high-quality tutorials and guides.
Contact Information
For any questions or concerns, please feel free to reach out via the contact page or by contacting me directly at [your email address]. I'm here to help and provide assistance.